Showing posts with label recipes. Show all posts

Wednesday, July 3, 2013

Lady Golden Glow Cake - Recipe

After posting the recipe for my quick and easy cocoa cupcakes,  I decided to venture into something more complicated (but not to much! By now, my readers must have noticed that my recipes tend to be very "user friendly"). But first, please, allow me to explain why I wanted to share this specific recipe with you.

I remember being little and my grandmother making this cake that completely fascinated me. I wouldn't exactly eat it, the combination of orange and dark chocolate is something that I enjoy a lot now, but back then it sounded just weird. Instead, I would sit  in front of the cake, staring at it for minutes unending, while often poking it gently to make sure it was real. It's a memory I wasn't even absolutely sure it had really happened. So, even after my mother's confirmation that the cake existed and gave me the recipe, I had to google it to make sure other people knew about it, and that the image I had of it wasn't just a product of my imagination. The Lady Golden Glow cake... really, who names cakes like that any more?... is now referred to as a Retro Cake! Isn't that just adorable? 

The original recipe is English so my grandmother had to convert it to grams, which made for really strange measures. To make it easier, I tried to convert it all back to cups.

for the cake:
1/2 cup butter (melted)
1 and 2/3 cups white sugar
1/2 orange zest
2 egg yolks
1 egg white
3 cups plain flour
3 tea spoons baking powder
a pinch of salt
1/3 of a cooking chocolate tablet (melted)

Pre-heat the oven.
Cream butter and sugar. Add the orange zest and the 2 egg yolks. 
On the side, mix together the flour, baking powder and salt and add it to the batter, alternating with the milk. 
Fold in the stiffened egg white. 
Divide batter into two parts in separate bowls. To one part add the melted chocolate. 
Alternate big table spoons of dark and light batter into the greased and floured cake pan. (I think a cake pan with a hole in the middle might work better but I had to use the plain one I have at home). 
Bakes at 180.C ( 350F.) for about 50 min. or until tester comes out clean.

for the glazing:
3 table spoons butter (melted) 
3 cups powdered sugar 
1/2 orange zest
1/2 orange juice + the pulp of that orange
1 egg white
the rest of the cooking chocolate (grate a bit for the top of the cake and melt the rest)

Mix and beat well the butter, sugar and the orange, zest, juice and pulp (no need to worry to much about these measures, I added the zest and then just squished out the juice and pulp with my hands).
Add the stiffened egg white.
Cover the top part of the cake with this mixture. While it's still soft add the grated chocolate. 
To the rest of the batter, add the melted chocolate, and spread it on the sides of the cake.


Having tasted it now, after so many years, I have to say I really like it. And for my big surprise, Emil absolutely loved it! ...and he can be really picky at times.

My parents scanned this page, with the Lady Golden Glow recipe, from my grandmother's old cooking book and I wanted to share it with you because I think it is a wonderful relic.

If you know this cake, or decide to try it, I would love to hear about it!


Saturday, May 11, 2013

Cocoa Cupcakes - Recipe


As promised on a previous post, I'm sharing the recipe for my easy, simple and delicious cocoa cupcakes. It makes for 5 or 6 cupcakes, not too sweet, but with an intense and wonderful cocoa taste... and smell!
This recipe is extremely easy and it doesn't make a big mess in the kitchen, so it became my "mid-night saviour , while in the middle of a series marathon, at late hours, and feel in need of something yummy.
It's a blessing and a curse...

2 table spoons butter (melted, 30 sec in the microwave)
1/3 cup sugar
1 egg
2 table spoons cocoa powder
½ tea spoon vanilla aroma 
½ cup flower + ½ tea spoon baking powder
2 table spoons milk

Pre-heat the oven at 180.C.
Use a small bowl and a whisker. Add the ingredients by the order above mixing well after each one. 
I use two VERY full spoons of cocoa because I really want to get an intense flavour.
Put 5 or 6 cupcake paper cups in a cupcake pan (no need to pre grease anything or wash the cups later) and distribute the batter using a table spoon.
Bakes for 15 minutes. 
I advise waiting a bit before eating them but in an emergency they go down well while still hot (because of the wonderful smell they release it's difficult to resist) with a cup of milk.


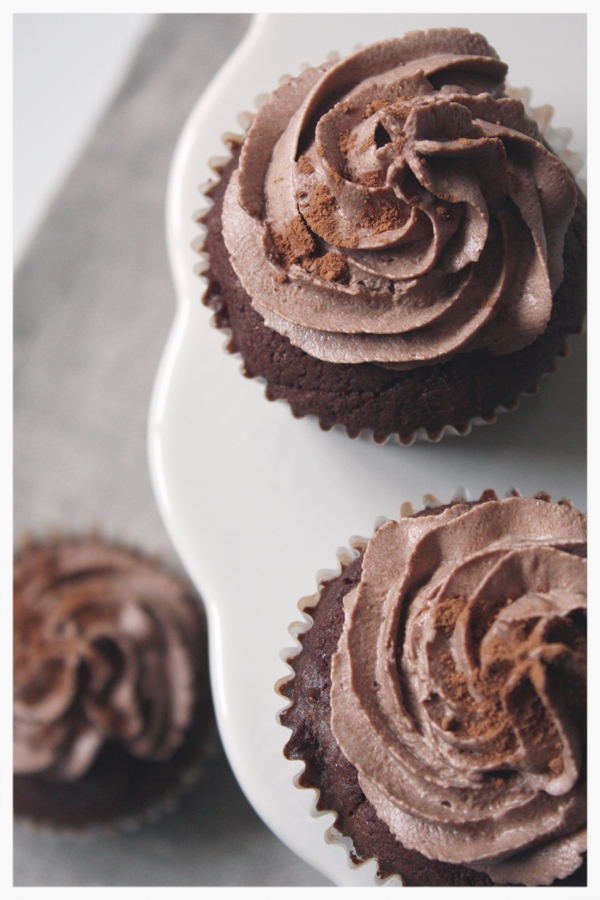
That was the basic recipe. But if you want to make it more fancy, then it's time to put that electric mixer to work, and get a nice frosting on your cupcakes. I personally love them simply with whipped cream. But today I tried a mascarpone and cocoa frosting. the mascarpone is to replace the typical butter-cream because Emil finds it too sweet.

4 table spoons mascarpone
2 table spoons heavy cream (might work with milk or sour cream)
2 table spoons cocoa powder
2 table spoons confectioners sugar
½ tea spoon vanilla aroma
a pinch of salt

Mix everything well and apply it with a piping bag and add a few sprinkle of chocolate on top, to make it more pretty. 


hope you like it as much as we do here!
Have a great weekend.


Saturday, February 16, 2013

Béarnaise Sause


Friday is the day I kick my diet in the butt and yesterday I gave it a royal kick with a big bowl of béarnaise sauce. The Mr. was craving for it and, since he behaved so well for the whole week by not eating things that would make me pull my hairs out in despair, I thought it was only fair to grant him his wish. I know you can buy this sauce in the supermarkets ready to eat or half prepared but... C'mon! It is not the same thing and it doesn't give half the satisfaction. It is indeed a tricky little thing to make, but once you get the hang of it you'll see just how much it is worth it. I use a recipe adapted and perfected by my father over the years. There are a few differences from the original recipe but the result is still amazing. If you feel brave enough give it a try.


this makes enough for 4 people:
(even though it's the amount I make just for the 2 of us at home...don't judge until you try it!)

1 small onion finely chopped (half the size of the one you can see in my pictures)
2 table spoons dry tarragon (or according to your taste)
White wine 
2 egg yolks
250g (a pack) cold butter (a good idea is to previously slice the butter into 7 or 8 pieces)

Throw the chopped onion and the tarragon into a small sauce pan and add the white wine just enough to cover it. In low heat let the wine evaporate completely (there should not be any liquid left but don't let it burn). 
Remove the sauce pan from the stove and place it's outside under cold running water for a few seconds (this is a nice trick). 
Now it's where the complicated bit starts. The thing about this sauce is that you need to have perfect control over it's temperature. Too much heat will make the yolks and the butter separate and not enough heat will make it stay liquid and not really a sauce. My two first attempts here in Denmark were a failure because I wasn't used to an electric stove. I used to cook with fire and had to figure out what the stupid numbers on this new stove meant. Finally I found out that number 3 was the one I wanted (out of 6). Moving on...
Get the butter out of the fridge at this point. 
Back to the stove, low flame or number 3, add the yolks and start stirring until you get sort of a paste (takes seconds). Then add a piece of butter and stir...never stop stirring...vigorously. when that piece is fully incorporated add another one and repeat the process. A good idea, to avoid over heating, is to add the pieces of butter and start stirring with the sauce pan on the stove and then, when it's half melted, finish it away from the heat. 
When all the butter is incorporated keep stirring, moving the pan on and off the heat if needed, until it gets the consistency of a sauce. And it's done!


Wednesday, January 16, 2013

Food : French Onion Soup & Homemade Bread

my first bread attempt

London is super-cold at the moment & recently I've been making lots of soups & stews.
I've also been making fresh bread.

Maybe because it's such an essential & basic food, there's something very gratifying & lovely about making your own bread.

This appears to be a foolproof & delicious recipe which has worked every time for me. 

Both of the recipes below are so simple so I thought I would share them....
a first for me, I never thought I'd be sharing recipes on my blog :)

If you've never made bread before, this is the recipe for you!

The bread recipe I use is incredibly quick, easy & tasty & is from Tana Ramsay's book
"Tana's Kitchen Secrets"

Easy Handmade White Bread
840g (1lb 13oz) strong white flour
2 x 7g sachets dried yeast
2 tbsp brown sugar
1 tbsp salt
sunflower oil for the bowl 

Add all ingredients to an electric mixer with a dough hook (I use my Kitchenaid).
Stir in 500ml/18 fl oz of tepid water & mix to a soft dough.
Knead for 5 mins or turn it on to a floured surface & knead for 10-15 minutes.
Place the dough in an oiled bowl, seal with clingfilm or a damp cloth.
Leave in a warm place to rise for 1.5-2 hours until doubled in size.
Place the dough on a floured surface & knead again for 5-10 minutes.

This mix makes two loaves - shape the dough into the shape of your choices....
I usually make a plaited bread (using 3 strands of dough plaited together....this is v easy),
but I've also made small rolls and a round loaf.
Dust your bread with a small amount of flour & place in the middle of a cold oven : 180C/350F/GasMark4 for 35 minutes or until golden brown.

Tips
Smaller loaves may require a slightly shorter baking time.
If you are not sure that your bread is cooked, tap it on the bottom - I was told that a cooked loaf should sound hollow. I have found this to be accurate :)
The above recipe uses white flour....I have also used wholemeal & granary flours.


Possibly my favourite soup is a French Onion recipe given to me by my French/Italian cookery teacher...another super-easy & quick recipe which is absolutely delicious.


French Onion Soup photo via Pinterest

50gr butter
750gr Onions finely sliced
2 garlic cloves finely chopped
40gr plain flour
1.5 litres of beef or chicken stock
250ml white wine
1 bay leaf
2 sprigs of thyme
12 slices of baguette (stale if you have some)
100gr finely grated gruyere cheese
Salt and pepper

1. Melt the butter in a heavy-based saucepan and add the onion.
2. Cook over a low heat, stirring occasionally, for 25 minutes, or until the onion is deep golden brown and beginning to caramelize
3. Add the garlic and flour and stir continuously for 2 minutes.
4. Gradually blend in 1 litre of the stock and the wine, stirring all the time and bring to the boil. 
Add more of the stock if the soup seems too thick.
5. Add the bay leaf and thyme and season.
6. Cover the pan and simmer for 25 minutes. 
Remove the bay leaf and thyme and check the seasoning.
7. Toast the slices of baguette, then divide among six warmed soup bowls and pour the soup over the top.
8. Sprinkle with the grated cheese and serve.

Thursday, December 13, 2012

Christmas Chocolate Biscuits


These last two weeks I've been spending my time between baking and running outside every time it starts snowing. And I mean that literally! I drop my oven mittens, put on my new gorgeous, baby blue,wellington boots and go out to try catching the snow flakes whit my face. For me, snow is still something new and exciting and I've been learning a lot about it. First of all, I learned that if I keep moving back and forth, from a warm oven to a frozen terrace, I will get a nasty cold...snif...snif. But that was totally worth it. I've seen snow I could shape and play with, snow that feels like sand and snow that was frozen and no fun at all. And I learned that there is a thing called "black ice" that is difficult to see and extremely slippery and that I need to be careful not to fall on my behind when I walk on it.

Now, this post isn't about snow but it all started on a snowy evening, when I was snuggling on my sofa, under a duvet, watching Nigella Lawson's special Christmas cooking program on TV. Amongst other delicious things, she started making these chocolate biscuits and it was love at first sight. When I saw that dough I KNEW I had to make them. And I'll say it again... it was when I saw the dough, not the actual biscuits... which probably means I have been baking way to much this last year! So I got up, "googled" the recipe (which you can see here) and it seemed simple enough for me.

These biscuits are not too sweet and they have a crunchy, sandy texture that I love (but if you have kids or a man at home that will mean lots of crumbs all over the place). The first batch I made ended up not having any sort of topping because I run out of confectioners sugar and this was at mid-night. But they were so delicious that they all disappeared before I had time to go buy more sugar. So I made another batch and today I tried the topping on half of them. I think they are pretty damn good to eat without the toppings, and the chocolate topping is a bit too sweet for my taste, but they do look more festive for the holiday season if you add a bit of colourful sprinkles and sparkles on top.

[updated] After I posted this recipe I gave one of the biscuits with topping to Emil, who had just gotten back home from work, to try. He said and I quote: "The topping distracts from the awesomeness of the biscuit". I couldn't have said it better and completely agree, so even though it looks pretty there will be no more toppings for me!

I made a few small changes so I'll leave you here the adapted recipe (most of the description was copied from the original recipe since I still find it hard to explain this things in English at times).

For the biscuits:
250g butter (soft)
150g confectioners sugar (caster sugar in the original)
40g cocoa powder
300g plain flower
3/4 tea spoon baking powder
a pinch of salt (the original recipe says bicarbonate of soda but  that thing leaves a weird after taste)

For the topping:
2 table spoons cocoa powder
175g confectioners sugar 
60ml water (boiling)
1 teaspoon vanilla extract
sprinkles of your choice

Pre-heat the oven to 170.C Cover 2 oven trays with cooking paper. 

Cream the butter and sugar in a bowl. Add the cocoa powder and mix well. Add the flour with the salt and baking powder and keep mixing. I used my electric mixer for this and after adding the flour I got a very lumpy mixture so I finished it with my hands.

Pinch of pieces from the dough, about the size of a big walnut, roll them into balls, and then slightly flatten into fat discs as you place them, well spaced, on your baking sheet (more or less 12 biscuits per tray)
The original recipe said that this dough was very sticky, but mine wasn't! Which I thought it was just perfect because I hate dough glued to my fingers. This was very, very easy to shape...oh, and delicious to eat!

Bake for 15 min. It won't feel as if they have had enough time but they will continue to cook as they cool. And they will get harder, so don't panic if they feel mushy as getting out of the oven. Let them cool on a cold surface before moving to the topping.

To make the topping, put all the ingredients, except the sprinkles, into a small sauce pan and whisk over a low heat until everything is smoothly combined. The original recipe says to leave it for 10 min, but my chocolate wasn't to warm to start with so I started topping the biscuits immediately. 

Ice 6 biscuits at a time with one table spoon of chocolate and then the sprinkles and let it cool completely.

And that's it! Easy no? And the best part is that they aren't really part of mine or Emil's Christmas traditions so I feel free to make them all year round :)

Merry Christmas and enjoy! 


Friday, November 16, 2012

Quick and beautiful last minute decorating ideas!

Is it just me, or did Thanksgiving really sneak up out of nowhere this year?  If you are like me, you're going to need a lot of last minute decorating ideas, which means, fast - but still adorable of course!

1. Find some free printables that look custom designed (skip goofy looking turkeys and pilgrims please!)  These menu templates are gorgeous, free, and she has lots of free matching goodies to go with it.  Get it here


2. Make some cinnamon roasted almonds.  These were life changing for me.  The are relatively easy (depending on the recipe you choose), you can make them in large batches (great for guest favors), and your kitchen will smell great.  Here's a recipe I found.


3. Keep your centerpieces simple and striking. Mason jar + stalks of dried wheat = homestead chic.

via OopsyDaisyCrafts

4. Add a memorable detail.  Who knew walnuts could look so expensive?  To boot - it's easy to do! Find out how at A Pumpkin & A Princess.


Happy weekend everyone!


Wednesday, November 14, 2012

Chocolate Mousse


One of the easiest desserts I've ever made and not less delicious because of it. This is my mothers recipe of an airy, fluffy mousse, not to dark and not to sweet. It's the mousse I used to eat in my childhood (there was no birthday party without it) with strawberries or strawberry jelly. I decided to serve it in individual flasks , which made it a lot more fun and perfect for eating in from of the TV while watching my favourite series.  Hope you like it.

250g dark cooking chocolate
4 table spoons confectioners sugar
1 table spoon butter 
8 eggs ( 8 yolks, 7 whites)

Melt the chocolate with the butter (I did it in the microwave) and mix. Add the yolks and the sugar to the chocolate and mix well. Beat the egg whites until stiffened. Add the whites to the chocolate mixture and mix it slowly with a whisker until you get an airy mixture. Pour the mouse in a bowl, or like in my case in small recipients/flasks for individual portions, and let it rest in the fridge for at least 1 hour. In my opinion it tastes better if you leave it longer, but that's a matter of personal taste. If you like it darker and stronger just add less egg whites. Oh! And for some extra "punch", and when we got older, my father used to had a bit of whisky or Frangelico (hazelnut liquor). 


Saturday, November 3, 2012

Baked (NOT) Doughnuts


I've been craving for a doughnut for a long time now. Unfortunately  that has proven to be a wish difficult to fulfil in this small town where I live. It's difficult to find a doughnut to start with, and when I do find one it is covered with chocolate or some other weird stuff, and I really only like simple doughnuts. So I turned my attention to some wonderful pictures on Pinterest that claimed to be of baked doughnuts. However, after actually reading a couple of recipes I lost all hopes of getting a real doughnut out of those recipes, but decided to try it anyway  and hope for the best. 

I picked up this recipe from 101 Cookbooks, because I'm a fan of the site. The instructions are very good, and much better than what I can write in English, so I decided to only post here the ingredients and some pictures to make it easier for my readers to decide if it's something they would be interested in. For more details please click the link above.

for the dough:

1 1/3 cups warm milk
1 packet active dry yeast (2 1/4 teaspoons)
2 tablespoons butter
2/3 cup sugar
2 eggs
5 cups all-purpose flour
A pinch or two of nutmeg, freshly grated
1 teaspoon fine grain sea salt


to cover:
1/2 cup unsalted butter, melted
1 1/2 cups sugar

1 tablespoon cinnamon

As I saw them getting shape and colour inside the oven, I knew I was not having doughnuts that evening. However, just like some "Ugly Ducklings" these...things, maybe bagels, I'm not sure what to call them (in Portuguese: qualquer coisa como um pão-de-leite adocicado)... are absolutely delicious in their own way. I decided to make a quick glazing (just water and confectioners sugar mixed until it has the right consistency) and it tasted wonderfully. Keep in mind that they should be eaten in the same day, they get hard and massive otherwise. And next time I won't bother shaping them as a doughnut. Small buns will be much easier to shape and I can cut them in half and have them with jam and cheese...yummy! 


Friday, October 19, 2012

Scones


When the days start getting shorter and darker, and it's cold and raining outside, there's nothing better than a warm cup of tea and some sort of "munchies" while watching a good series on TV. And there's no better "munchie" for this than scones. My problem was that I didn't really like the recipe I had. The scones would get very compact and hard. I swear they could make a hole in the wall if I had thrown them. So I asked my sister if she had a good scones recipe that I could try. She gave me the one I'm posting here and I'm very happy about it. Done it twice now (in a week!) because it's so easy and quick to make, and the scones are delicious. Even Emil, that is normally picky with this sort of food, loved them. 

3 cups of flour
2 tea spoons of baking powder
½ tea spoon sal
125g (half a pack) butter
1 cup milk
1 egg

1 yolk to brush on top of the scones.

Mix very well all the ingredients in a bowl. Pre-heat the oven at 180.C. Shape the scones and placed them on an oven tray covered with cooking paper. with these quantities I made 9 scones, but I like them big(ish). Brush the top of the scones with the remaining yolk. Goes to the oven at 180.C for 30 minutes (more or less depending on the oven).

I love having them right out of the oven, with butter and my home made jams, and when no one is looking I also add some whipped cream (shame on me!).


Monday, September 24, 2012

Apple Pie


Last week my friend Linda was picking some apples and saying that she wanted to make an apple pie. So I promised her to put on the blog the recipe of the only apple pie I actually like. Until I was maybe 20 or 21 years old I hated apple pie. The problem was, I didn't like the thick, soft, gooey layer of apple. Then my sister gave me this recipe which has a very thin layer of apple and, as a bonus, it has a topping made of butter and sugar caramelized, and now I love apple pie...well, this one at least. And now that I think of it, this was the first baked desert I made. It's simple and quick and anyone with no experience in baking can do it.


dough:
250g flour
125g butter
1 egg

topping:
125g sugar
125g butter

3 or 4 apples

Mix all the ingredients for the dough and let it rest for 20 min. Pre-heat the oven at 180.C. Cover a deep-dish pie plate (coated with cooking spray or butter and flour) with a thin layer of dough (just enough so it won't break) leaving a slightly elevated border all around. Cut the apples in very thin slices (and when I say thin I mean really thin) and cover the base of the pie placing them like an open fan. For the topping, melt the sugar and the butter in a sauce pan and pour it over the entire pie. Goes to the oven for 30 min. 

I love to make a small change and add grated gruyère cheese on top of everything at around 15 min after being in the oven. But some people call me weird because of that... they really don't know what they are missing! The contrast between the sweet and the salty is divine. But for the more traditional approach just sprinkle some cinnamon on top, after the pie has cooled down, and serve with vanilla ice-cream or whipped cream


Related Posts Plugin for WordPress, Blogger...